Baked Orange Cheesecake—Prototype 3:
 
Another 21st century cheesecake with a "Prototype 3" start?? Yes, for the same reasons as its lemon counterpart (see Baked Lemon Cheesecake—Prototype 3, for more details).

Just like the lemon cheesecakes I made back in the late 1980's, I made two orange ones as well. No crust was involved. However, I did make these two cheesecakes with orange flavor intentions. The salt usage for the batter of both of them was higher compared to that of this more recent 21st century recipe below.
 
Crust:
1.5 oz. melted, white chocolate
3 tablespoons orange juice
1/2 tablespoon grated orange peel
3 tablespoons sugar
4 oz. lowfat cottage cheese, whipped (such as Hood, no salt added)
Fully blend the above ingredients before adding:
2.2 oz. finely ground Bran Buds
Blend the Bran Buds into the above mixture as quickly as possible and then pour quickly into a greased springform pan, 9".

Mix thoroughly together:
2 tablespoons butter, softened or melted
1/2 cup sugar
Then blend in:
1/4 cup orange juice
Then mix in:
2 cups (such as a 16-ounce container) of lowfat cottage cheese (such as Hood, no salt added)—whip this in a blender just until the curds no longer show, before adding to the above ingredients.
Next add:
1/2 cup skim milk
Follow up gradually with a dry combination of:
1 teaspoon grated orange peel
1/4 cup flour
1/4 teaspoon salt
Completely mix all of the above ingredients used so far, then finally add:
2 eggs (last ingredient here)—aim to get these at least fully mixed in (yet without overbeating, if possible).

Make sure that the oven is preheated to 300 degrees. If using the bath approach, have enough boiling hot water available, and fill a large "tub" with it and place this in the oven, close to halfway up.

Pour the batter into the springform pan. Next, put this pan into the oven. If using the bath approach, place the springform pan immediately above the "tub". Bake for about 90 minutes. Afterward, take the springform pan out of the oven, and let the cheesecake cool off. After it has cooled down to about room temperature, carefully remove it from the pan, and refrigerate.
 
The Living Hope Church in Beverly was my "taste lab" for this one on an Easter Sunday. I asked a number of people who tasted this prototype about how much orange flavor they could detect. A typical response was that this flavor was somehow adequate. However, I personally sensed that the orange was still a bit weak. I could barely taste it in the batter, although it was slightly more present in the crust. I also felt that the crust should be a little sweeter.
 
Baked Orange Cheesecake—Prototype 4:

Repeat Prototype 3, but...

Make these changes for the crust:
Boost white chocolate by 1/2 oz., to 2 oz.
Boost orange juice by 1 tablespoon, to 1/4 cup.
Boost sugar by 1 tablespoon, to 1/4 cup.

And make this change for the batter:
Boost grated orange peel by 1 teaspoon, to 2 teaspoons.
 
This time, I was considerably more satisfied with the orange flavor, in both the batter and the crust. This cheesecake was a terrific hit at the Sports Page when I brought it there, just like the third prototype of its lemon counterpart.

With this fourth orange prototype, I felt that I would go back to giving the "in-the-tub" (as opposed to "above-the-tub") approach another try. Inasmuch as baking the cheesecake above the water produced results that were okay, I still felt that this method wasn't quite the same as placing the pan directly into the water. But this time I took two defensive measures against water leakage. One was to use
two pieces of heavy duty foil, instead of one. The other was to "disturb" the foil as little as possible. That meant taking the two pieces of foil, placing one on top of the other, keeping them flat, and not wrapping the pan until it was ready to go into the oven. So I carefully put the foil on immediately after pouring the batter, gently pressing the foil up the sides of the pan, then I put the wrapped pan into the "tub", which was promptly placed into the oven. The outcome was an awesome cheesecake with no water leaks.

I think one of my past mistakes was "disturbing" the foil too much, likely in wrapping the pan even before I
greased it. Pressing the crust into it would add to the potential disturbance. From what I best recall in my Internet research, somebody reported triple-wrapping a cheesecake pan and still had leakage problems. My guess: too much disturbance of the foil before baking.

The moral of the story—"Do not disturb!" Adhere to this rule
as much as possible with the foil, until the baking is done and the pan is taken out of the water. Grease the pan, press in the crust and pour the batter first. Afterward, wrap the pan carefully, then place it into the "tub" and bake.
 
Baked Orange Cheesecake—Prototype 5:
 
It was probably about a couple of years since I last made an orange cheesecake. The latest one presented here gets a major update, particularly with yogurt cheese, and a size upgrade. This cheesecake is also the first one for which I used regular All-Bran, rather than Bran Buds (click here for more information on this change).
 
Yogurt Cheese:
Prepare ahead of time 3 pounds of yogurt cheese, derived from three 32-ounce containers of nonfat yogurt. If the resulting yogurt cheese falls below 48 ounces, add back enough of the whey (that was strained out from the yogurt) to make up the difference.

Crust:
2 oz. melted, white chocolate
1/4 cup orange juice (tip: microwave this juice a little, then add it directly to the melted white chocolate, and mix thoroughly)
8 oz. (1 cup) yogurt cheese (see above)
5 tablespoons sugar
2 teaspoons grated orange peel
2 oz. All-Bran, ground up

Gently pour this crust mixture into bottom of pan (9 to 9 1/2 inches) and pre-bake without tub at 300 degrees for 10 minutes, then cool enough to comfortably touch at least the pan's upper sidewall.

Batter:
4 tablespoons melted or softened butter
1 1/3 cups sugar
1/2 cup orange juice
4 teaspoons grated orange peel
1/4 cup all-purpose flour
3 tablespoons arrowroot
40 oz. (5 cups) yogurt cheese (see above)
2 teaspoons vanilla
4 eggs

Pour the batter over the crust and bake this cheesecake in a tub at 300 degrees for 100 minutes (if using a 9 1/2" pan). Then cool the cheesecake down while still in oven (with this oven shut off) and in tub with door slightly ajar for an hour. Afterwards, remove from oven and tub and continue to cool down at room temperature for another 100 minutes, then remove from pan and refrigerate.
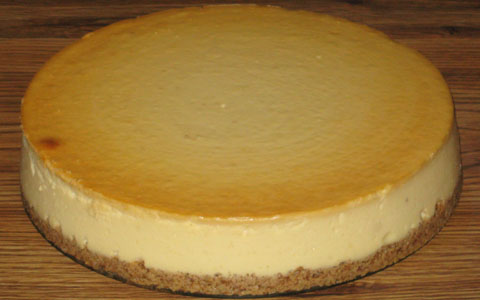
Orange Cheesecake—Prototype 5

The art of breaking an egg has been an elusive skill to me. Sometimes the breaking turns out nicely. Sometimes it's not all that great. Many times I have had to draw out egg shell pieces. But for this cheesecake, I broke one of the eggs so badly that I lost much of its white. I cracked it likely too harshly, with a butter knife. Nevertheless, this did not stop the cheesecake from coming out firm enough, so the egg white's loss hopefully did not amount to an awful lot.

I picked up a decent orange taste in this prototype. The crust, in particular, had a nice zing to it. This "rise and shine" cheesecake went over well at a Living Hope Father's Day (2013) brunch. Many other items were served (including shoo-fly pie!), and there was about a fourth of the cheesecake remaining when the leftover foods were retrieved into the kitchen. But by the time I got my springform pan bottom—which also functioned as a serving dish—back (probably about a half hour later), I was informed about the last slices being taken. So I had none to take back home.
 

Back to my bushy homepage