|
|
 |
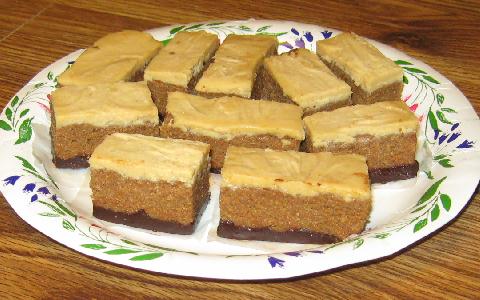
Chocolate Peanut Butter Bran Buddy Bars—Prototype 1:
Uses two 8-oz. packages of Philly 1/3-less-fat cream cheese
Crust:
Melt: 12 oz. semi-sweet chocolate
Add: 2 oz. Philly 1/3-less-fat cream cheese (softened)
Add: 2 tbsp. sugar
Add: 1 tbsp: skim milk
Mix together.
Add: 1/2 package (i.e., 8.8 oz.) of Kellogg's All Bran Bran Buds
Mix together.
Press into 13" x 9" pan (a good idea is to line it with wax paper
first).
Refrigerate, at least until reasonably firm.
Filling:
Soften: remaining 14 oz. of Philly 1/3-less-fat cream cheese
Add: 4 oz. creamy peanut butter
Add: 3/4 cup sugar
Mix together.
Add filling on top of crust and spread out.
Refrigerate until firm, then cut into squares.
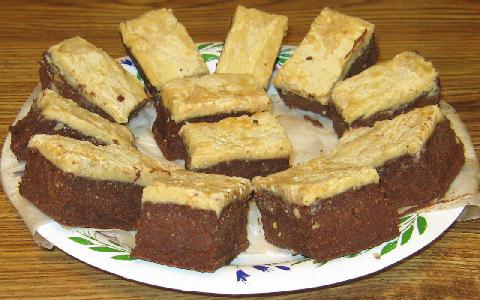
Chocolate Peanut Butter Bran Buddy Bars—Prototype 2:
Still uses two 8-oz. packages of Philly 1/3-less-fat cream cheese
Crust:
Melt: 12 oz. semi-sweet chocolate
Add: 4 oz. (INSTEAD OF 2 oz.) Philly 1/3-less-fat cream cheese (softened)
Add: 2 tbsp. sugar
Add: 1 tbsp: skim milk
ADD: 2 TEASPOONS OF VANILLA
Mix together.
Add: 1/2 package (i.e., 8.8 oz.) of Kellogg's All Bran Bran Buds
Mix together.
Press into 13" x 9" pan (a good idea is to line it with wax paper
first).
Refrigerate, at least until reasonably firm.
Filling:
Soften: remaining 12 oz. (INSTEAD OF 14 oz.) of Philly 1/3-less-fat cream
cheese
Add: 4 oz. creamy peanut butter
ADD: 2 OZ. SEMI-SWEET CHOCOLATE (MELTED)
Add: 3/4 cup sugar
Mix together.
Add filling on top of crust and spread out.
Refrigerate until firm, then cut into squares.
SUMMARY OF DIFFERENCES FOR PROTOTYPE 2, COMPARED TO PROTOTYPE 1:
Crust gets 2 teaspoons of vanilla, plus 2 additional oz. of cream cheese.
Filling gets 2 less oz. of cream cheese. In other words, 2 oz. of the cream
cheese gets shifted from the filling to the crust. Filling also gets 2 oz.
of melted semi-sweet chocolate.
Originally, the aforementioned 2 oz. of chocolate for the filling was
supposed to be shifted from the crust's allocation (resulting in only 10 oz.
of semi-sweet chocolate for the crust), but this step was forgotten. So the
crust still got a full 12 oz., all of this chocolate being mixed in and the
crust being made up before the error of forgetfulness was discovered. So a
separate allocation of 2 oz. of chocolate was used for the filling
(resulting in a total of 14 oz. of semi-sweet chocolate for the entire
recipe, instead of 12 oz. as originally planned). It is hoped that next
time, the step to take 2 oz. from the 12 oz. allocation of melted chocolate
will NOT BE FORGOTTEN.
Chocolate Peanut Butter Bran Buddy Bars—Prototype 3:
What Prototype 2 was meant to be. In other words, a grand total of 12 oz.
semi-sweet chocolate was used for the entire recipe. Memorial success won
out this time as the crust got only the intended 10 oz. of the melted
chocolate (and the filling still got the remaining 2 oz.).
However, a new concern was triggered by eating these bars perhaps a day or
so after they were prepared. The Bran Buds lost their crunch! It is likely
that the moisture from other ingredients rendered them more chewy and/or
soggy. The result was a texture that did not seem to feel great when eaten.
Somebody suggested using Splenda (sucralose) instead of sugar to suppress
the crunch's loss.
Chocolate Peanut Butter Bran Buddy Bars—Prototype 4:
Repeat Prototype 3, 12 oz. total of melted semi-sweet chocolate and all, but
with a new approach. Give up on the crunch. But avoid the unsatisfactory
texture of the seemingly soggy Bran Buds as well.
All of the ingredients, both for the crust and for the filling are
ultimately mixed together before being put into the pan. But...the Bran Buds
are finely ground in a blender to a flour-like texture first, before being
added to the other ingredients.
Here is a suggested sequence (with the quantities repeated for convenience):
Soften: two 8-oz. packages of Philly 1/3-less-fat cream cheese (and set
aside)
Grind: 1/2 package (i.e., 8.8 oz.) of Kellogg's All Bran Bran Buds (and set
aside)
Make sure the Bran Buds are finely ground to a flour-like texture (use a
blender or food processor).
Measure: 3/4 cup PLUS 2 tbsp. sugar
Add: 1 tbsp: skim milk
Add: 2 Teaspoons of vanilla
Mix together.
Add: 4 oz. creamy peanut butter
Mix together.
Melt: 12 oz. semi-sweet chocolate
Combine this with the sugar/milk/vanilla/peanut butter mixture (quickly,
while the chocolate is still melted).
Next, add the softened cream cheese to the above mixture, and mix well.
Finally, add the powdered Bran Buds to this mixture, and blend well (plenty
of effort needed here as the texture becomes stiff). Spread all this into a
13" x 9" pan (a good idea is to line it with wax paper first).
Refrigerate until firm, then cut into squares. Expect a somewhat fudge-like
texture. Please keep in mind that sugar was used in this prototype (not
Splenda).
Chocolate Peanut Butter Bran Buddy Bars—Prototype 5:
While Prototype 4 had a decent taste, its single-mixture appearance might
have been too mysterious for some. So it's back to the two-layered approach,
but with some major changes: The peanut butter goes to the bottom, and the
chocolate (all of it!) goes to the top. And baking (!) is added as well.
First, the crust. Start with the first 8-oz. package of the softened cream
cheese and blend it with the 4 oz. of creamy peanut butter, the 1 tbsp. of
skim milk, the 1/2 package (i.e., 8.8 oz.) of Bran Buds, finely ground, and
1/2 cup of the sugar. Press it all into a 13" x 9" pan (lined with
wax paper).
Then bake this crust at 350 degrees (preheat the oven first) for 10 minutes.
Next comes the filling, a blend of the second 8-oz. package of the softened
cream cheese, the entire 12 oz. of melted, semi-sweet chocolate, the 2
teaspoons of vanilla and 1/4 cup plus 2 tbsp. of the sugar.
Spread this filling evenly onto the crust in the pan (cooling it off first
is not necessary, and was largely skipped here).
Then return the pan to the 350-degree oven for another 10 minutes. Remove
and let cool afterward, for about an hour, then place into refrigerator, and
let the recipe firm up there before cutting into squares.
One of the challenges was deciding how much of the recipe's total sugar to
allocate to the crust, which was initially going to contain only the peanut
butter and the ground Bran Buds, along with the crust's small share of the
sugar. However, this mixture was determined to be way too dry. Ultimately,
some of the cream cheese (likely all of which was originally planned to be
allocated to the filling) was gradually added to get the moisture up. And
this was done, unfortunately, after the peanut butter and the Bran Buds
powder got mixed together earlier. So blending in the cream cheese was
difficult. Some heating assistance was needed, therefore the mixture got a
little "microwaving" in order make the cream cheese hopefully more
workable. The milk, originally planned for the filling on top, also got
switched to the crust on the bottom in order to contribute to the moisture.
So the filling got "robbed" of all of its milk, half of its cream
cheese, plus some of its initial share of the sugar (to compensate for the
cream cheese shift) in order to "pay" the "thirsty"
crust. To bake this crust was also a late decision, in hopes of possibly
enhancing the blend for a better firmness, in light of the cream cheese's
late addition (and therefore difficulties in blending) to the crust. The
filling's stiffness led to the additional baking (in hopes of the filling
evening out more).
It should also be noted here that the peanut butter used in this prototype
was unsalted (salted varieties were likely used in at least some of the
earlier prototypes).
The result of all this is a lightly-colored crust on the bottom, along with
dark-colored filling on top, in keeping with the looks of many popular,
square-shaped, baked goods. Furthermore, the peanut butter's light, brown
color matches the crust exclusively containing it. And the filling's dark,
brown color does a good job of reflecting the chocolate solely allocated to
this upper layer.
Chocolate Peanut Butter Bran Buddy Bars—Prototype 6:
A repetition of Prototype 5, but with some challenging reallocations (and
additional, yet minor changes)!
Shift 4 ounces of cream cheese from the filling to the crust (2 tablespoons
of sugar were also supposed to be transferred along with this cream cheese
in the filling-to-crust shift, and probably was indeed done, but the memory
of this action is not 100% certain).
Sequential details (combining order) for crust:
12 oz. cream cheese
4 oz. unsalted peanut butter
1 tbsp. skim milk
(blend the three wet ingredients above before adding the two dry ones below)
1/2 cup plus (hopefully) 2 tbsp. sugar
8.8 oz. Bran Buds (ground up, of course)
Sequential details (combining order) for filling:
12 oz. melted, semi-sweet chocolate
2 teaspoons vanilla (should have added this one last, instead of at this
point, because it quickly stiffened the chocolate)
4 oz. cream cheese
1/4 cup (hopefully only this amount) sugar
Now things get really challenging. Press only HALF the chocolate filling
into the 13" x 9" wax-paper-lined pan (if necessary, apply a
minimal amount of broiler heat to facilitate the spreading). Then firm this
up by chilling it in the freezer for 20 minutes.
Remove the pan from the freezer, and add the crust mixture on top of the
lower chocolate layer. Press it down firmly, then return the pan to the
freezer for another 20 minutes.
Next, take the pan out of the freezer and press the remaining half of the
chocolate filling on top of the crust layer. This step was too difficult,
because the chocolate hardened too soon. Got to cut down next time on the
freezer duration that follows the crust addition (seems like the filling
absorbed the crust's cold temperature too quickly). Just make sure that the
crust is packed as firmly as possible. But not all was lost, thanks to a
quick heat application (broiling the pan in the oven for about a couple of
minutes). Spreading the top filling suddenly became extremely easy.
Next, it's "back to cool" time, but this time the pan goes into
the refrigerator, not the freezer.
Far more than enough time required for firmness passed (probably about two
hours) before the contents of the pan were cut.
Unfortunately, the chocolate filling tended to break up badly during the
cutting phase. Applying some oven heat helped a little, but not enough.
Chocolate Peanut Butter Bran Buddy Bars—Prototype 7:
This was sort of a new one, featuring three distinct layers and a new
ingredient: white chocolate. Due to this prototype being made after
Prototype 2 of the Chocolate (only) Bran Buddy Bars, whipped cottage
cheese (lowfat, of course) replaced the cream cheese as well.
Sequential details (combining order) for lower filling:
6 oz. melted, semi-sweet chocolate
2 oz. whipped lowfat cottage cheese
1/8 cup sugar
1 teaspoon vanilla (last ingredient here!)
Sequential details (combining order) for crust:
14 oz. whipped lowfat cottage cheese
2 oz. unsalted peanut butter
1 tbsp. skim milk
(blend the three wet ingredients above before adding the two dry ones below)
1/2 cup plus 2 tbsp. sugar
8.8 oz. Bran Buds, ground up
Sequential details (combining order) for upper filling:
6 oz. melted, white chocolate
2 oz. unsalted peanut butter
1/8 cup sugar
1 teaspoon vanilla (last ingredient here!)
Tip: 1/8 cup of sugar weighs 1 ounce, so if a measuring cup of this size is
not available, try using a kitchen scale instead.
Note a 2 ounce swap—2 ounces of the peanut butter being switched from the
crust to the upper filling (mainly to give this filling more of a peanut
butter color), and 2 ounces of cottage cheese (the upper filling's entire
Prototype 6 share in its corresponding cream cheese form) being switched
from the upper filling to the crust.
Also note that the white chocolate replaces the semi-sweet on the top layer.
The pan procedures were similar to those of Prototype 6 (20-minute freezer
exposures, etc.), and the full recipe was actually used here—not
half—along with, however, a 9" x 9" pan (see the comments above
on Prototype 1 of the Chocolate Bran Buddy Bars for further info on this
issue). The cutting was done after probably about an hour and a half of
refrigeration (i.e., that occurred right after the top layer's placement).
There were still some disintegration problems, mainly with the semi-sweet
chocolate filling layer. However, the resulting cut bars were each
transferred to an individual-sized piece of wax paper, re-assembled with the
the broken filling sections, then heat-treated (semi-sweet side up, under
the broiler), and this approach ended up working out quite well. The bars
were then transferred back to the refrigerator for re-hardening.
"Integrated" success was hopefully attained at last!
Chocolate Peanut Butter Bran Buddy Bars—Prototype 8:
How about doing to the Chocolate Peanut Butter Bran Buddy Bars the same kind
of thing that was done for Prototype 3 of their chocolate-only counterparts?
In other words, merge the lower, dark, chocolate filling layer into the
crust mixture, but retain the peanut butter filling layer on top.
While this method would make the recipe simpler, another helpful idea
involved an extremely minor shift for the sugar. More specifically, the
total sugar used here amounted to 3/4 of a cup plus 2 tablespoons. The
distribution of this ingredient on Prototype 7 was:
Bottom filling: 1/8 cup
Crust mixture: 1/2 cup plus 2 tablespoons
Upper filling: 1/8 cup
But efforts to measure 1/8 of a cup had been a challenge, due to lack of a
measuring cup in this size. Some claims out there have somehow indicated
this amount as being equal to 2 tablespoons. However, a closer check would
reveal 1/8 of a cup to be more than that, but it wouldn't be by much.
In fact, the difference was negligible enough to make a minor change in how
the sugar would get measured out for this prototype. By merging the two
lower layers based on the above info, the sugar allocation would be:
Combined bottom filling/crust mixture: 1/2 cup plus 1/8 cup plus 2
tablespoons
Upper filling: 1/8 cup
Due to the small enough difference between 1/8 of a cup and 2 tablespoons, a
tiny allocation swap could be made, and the recipe total for the sugar would
still be 3/4 of a cup plus 2 tablespoons, as follows:
Combined bottom filling/crust mixture: 1/2 cup plus 1/8 cup plus 1/8 cup
Upper filling: 2 tablespoons
Hence the sugar for the combined lower mixture would now add up to an
easier-to-handle 3/4 of a cup (and measuring this ingredient for the
upper filling would be easier as well)!
Here, then, are the simplified details:
Crust:
16 oz. whipped lowfat cottage cheese
2 oz. unsalted peanut butter
1 tbsp. skim milk
(blend the above three ingredients before adding the next four ones below)
3/4 cup sugar
6 oz. melted, semi-sweet chocolate (be sure to quickly stir this one in
while it is still melted)
1 teaspoon vanilla (next to last ingredient here!)
8.8 oz. Bran Buds, ground up
Filling:
6 oz. melted, white chocolate
2 oz. unsalted peanut butter
2 tablespoons sugar
1 teaspoon vanilla (last ingredient here!)
Press the crust mixture into a 9" x 9" wax-paper-lined pan. Then
firm this up by chilling it in the refrigerator (not the freezer this
time—it has been determined that refrigeration is sufficient) for 20
minutes.
Remove the pan from the refrigerator, and add the peanut butter filling on
top of the crust layer. If broiler heat is needed, be very careful. Use just
enough to make the filling spreadable (too much heat can brown the filling).
When the pan is cool enough to be comfortably touched, put it into the
refrigerator. Chill until the top filling is almost completely firm, about
60 to 90 minutes, then cut into bars. Return these to the refrigerator, and
chill until fully firm.
Seems like
something went wrong when I tried to compare 1/8 of a cup to 2
tablespoons for this prototype. Chances are, I was using a small
cup that indicated a measurement of 2 tablespoons—a quick,
convenient way to make such a measurement, rather than using a
single measuring tablespoon twice. A few weeks after making this
batch of bars, I did some additional research on the Internet in
regard to the question of how many tablespoons were in 1 cup. I
kept on getting 16 as the answer here. This would mean that 1/8
of a cup would equal only 2 tablespoons—not more than
that, as I thought earlier!
But I wondered why I came up with such a different evaluation.
So I took some measuring spoons and cups, did some further
research, and determined that the "2 TBSP COFFEE
MEASURE" which I very likely used in the earlier comparison
was, in fact, deficient (no, this supposedly was not from a
coffee can, but rather part of a regular set of measuring cups).
Maybe this particular cup was meant for heaping, not leveling.
So after checking with the other measuring utensils, I have
finally arrived at the conclusion that 1/8 cup = 2 tablespoons. |
|
|

|