Baked Cookies+Creme Cheesecake—Prototype 8:
 
In light of my trying to get a more even distribution of cookies throughout the batter, I actually took a four-layered approach with Prototype 2 of my chocolate chip cookie dough cheesecake. That concept is utilized in the latest chocolate sandwich cookie prototype presented here. As for how many cookies to use this time, instead of picking a number like 32 or 24, I decided to simply use an entire single package of the Back To Nature cookies, which would give me a number somewhere in between (I counted 29—I expected a multiple of 3, due to the packaging's 3 rows—maybe a minor fluke occurred).

I remembered one person commenting on the deficiency of the cheesecake-like taste in Prototype 7. I myself felt that more tartness was needed. This led me to make an all-yogurt-cheese plain cheesecake (see
Baked Plain Cheesecake—Prototype 11 for further info), the taste of which ended up being terrific—the tartness, in particular, not being excessive. That approach is used in Prototype 8 here. Even though this one contains chocolate, it's in the form of cookie pieces. I reasoned that while a fully-blended, chocolate-flavored batter would probably be best with a lower-tartness cheese base (such as a 2-to-1 yogurt-cottage blend), a plain-flavored batter with bits of a chocolate sort should be on the higher-tart side. This was due to how the bite of a chunky type of cheesecake would break down inside the mouth. A batter with scattered chunks in it did not quite have the same taste effect as its fully-homogenized counterpart. So, instead of an eater trying to enjoy a single, collective flavor when chewing, he/she was apt to experience multiple distinctive tastes. Conclusion: let the taster enjoy the cookie and the "cheese-i-ness", each in their own right.

I also felt that, starting with this particular cheesecake, some changes were in order for the chocolate crust.

It seemed that my more recent batters have become so good, that they were putting the crusts to shame. I was starting to reason that the chocolate should be a little more bittersweet. Given that the crust's taste hopefully appeared (at least to me anyway) to be more than sweet enough, I decided to simply add a little more cocoa powder.

It was also time to give some thought to the Bran Buds. Why have I been using 2.2 ounces? Why not a more rounded 2??

This "2.2" was derived from a system of measurement going back to my earlier Bran Buddies recipes. This Kellogg's product was sold in 17.7 ounce boxes. In order to make better use of these boxes, I was somehow moved to use simple fractional amounts. When I began experimenting with my Bran Buddy bars, they needed close to half of a box. If I were to stick with precisely half of a box, I could easily make two batches. If I measured out half the box for one recipe, I would afterward have the remaining half pre-measured for a future recipe. If I made a double-sized batch, I could simply open and use one entire box. This led me to specify 8.8 ounces for a typical single-sized batch. Half of 17.7 was actually 8.85, but I simply rounded that to 8.8 (if I ended up using 8.9 "leftover" ounces in the next recipe, the .1 ounce difference was too trivial). In light of my wanting fiber in my cheesecake crusts, I felt that I would make extensive use of the Bran/Hifi Buddy formulas, reducing them by simple fractions. This resulted, among other things, in 8.8 ounces being divided by 4, and 2.2 was what I came up with.

For this latest prototype, I felt that cutting down a little on this high-fiber "flour base" would somehow contribute toward making the crust more tasty (yet without too much sacrifice on the fiber). Another thing that I noticed lately was that I was needing more effort in distributing the crust throughout the pan. This was likely due to whipped cottage cheese being less thick than yogurt cheese, and I have been shifting more and more from the former towards the latter these days. So using less of the ground-up Bran Buds would, hopefully, result in the crust mixture becoming a little more easily spreadable again.
 
Yogurt Cheese:
Prepare ahead of time 3 pounds of yogurt cheese, derived from three 32-ounce containers of nonfat yogurt. If the resulting yogurt cheese falls below 48 ounces, add back enough of the whey (that was strained out from the yogurt) to make up the difference.

Crust:
4 oz. semi-sweet chocolate, melted
2 tablespoons cocoa powder
8 oz. (1 cup) yogurt cheese (see above)
3/8 cup granulated sugar
1 teaspoon vanilla
2 oz. finely ground Bran Buds

Place all this into a 9 or 9 1/2 inch springform pan.

Batter:
4 tablespoons melted or softened butter
1 1/4 cups granulated sugar
1/4 cup all-purpose flour
3 tablespoons arrowroot
1/2 teaspoon salt
40 oz. (5 cups) yogurt cheese (see above)
2 teaspoons vanilla
4 eggs

Cookies:
1 package, a 12-ounce size or—if package is a different size—12 ounces, of chocolate sandwich cookies, broken preferably in halves (Back To Nature Classic Creme Cookies are recommended—not only for their great, all-natural taste, but these were found in 12-ounce packages)

Expect about 7 cups of the resulting batter, but do not add this to the pan all at once. Rather, this needs to be done in five installments. Wrap the pan in foil just before adding the first installment. Minimize the foil's disturbance in order to minimize its leakage risk.

For each of the first four installments, add about 1 1/2 cups of batter and one fourth of the cookies to the pan. There is no need to be exact—evenly distributing the cookies is the intent here. Because of this, use extra care in the later installments when adding contents (i.e., do it gently) to the pan. Ensure that the cookies are fully coated, and immersed as much as possible. After adding the installment, bake the pan with its contents for 15 minutes. For each of the first three installments, bake at 325 degrees. For the fourth installment, reduce the temperature and bake at 300 degrees. For all four installments here, bake with the pan in a tub filled with at least 1/4 to 1/2 inch of boiling water, but (to reduce spillage risks) do not fill the tub all the way at this point, because the whole tub-and-pan assembly is going to need to be removed from the oven (in order to comfortably add contents to the pan) between installments.

After all this is done, there should be about a cup of batter but no cookies remaining, with 60 minutes of baking time reached at this point (15 minutes for each of the first four installments). Now comes the fifth installment—carefully add the last of this batter on top of the pan's other contents. Try to fully coat the entire surface, especially wherever cookie pieces may be showing. Next, return the entire pan-and-tub assembly to the oven. At this point, fill up the tub generously with boiling water. Resume baking at 300 degrees for another 55 minutes (based upon usage of a 9 1/2" pan).

Afterward, shut the oven off, and leave its door slightly ajar, with the cheesecake still inside—and in the tub—for an hour. Next, remove the cheesecake from the oven and tub, and—if desired—add a border of chocolate chips around the edge of this cheesecake. Continue to cool it down at room temperature for another two hours. After doing so, remove the cheesecake from pan and refrigerate.
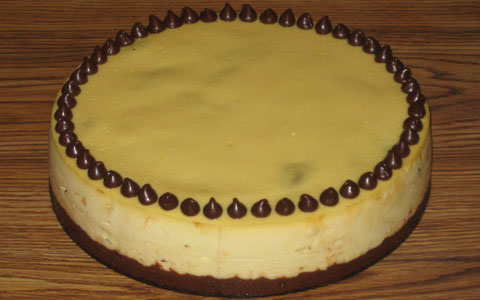
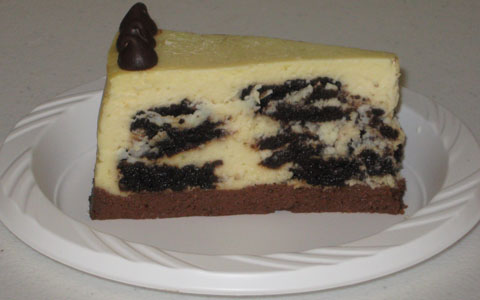
Cookies+Creme Cheesecake—Prototype 8 Cookies+Creme Cheesecake—Prototype 8 (sliced)

I was happy with the way the cookies got distributed. The taste of Prototype 8 was great. I felt that even the crust was an improvement, with a nice tartness, yet hopefully still sweet enough. I did have a little concern about there remaining too many cookies, but perhaps only a few too many—I could still pick up some nice cheesecake flavor.

And, as typical at Living Hope Church these days, the whole thing was gone quickly enough (probably within half of an hour), among a moderate selection of snacks.
 

Back to my bushy homepage