|
|
 |
Baked Chocolate Cheesecake—Prototype 16:
2-to-1 Blend of Yogurt Cheese and Cottage Cheese:
Prepare ahead of time 32 ounces of yogurt cheese, derived from two 32-ounce
containers (that's 64 ounces altogether) of nonfat yogurt. If the resulting
yogurt cheese falls below 32 ounces, add back enough of the whey (that was
strained out from the yogurt) to make up the difference. To this yogurt cheese
combine one 16-ounce container of whipped, lowfat cottage cheese.
Grease a 9 1/2" (or 9") pan, but do not wrap foil around it until just
before the batter is added (spreading the crust in an already wrapped pan can
result in greater disturbance to the foil, thus increasing leakage risks).
Chocolate Crust:
4 oz. semi-sweet chocolate, melted
2 tablespoons cocoa powder
8 oz. (1 cup) 2-to-1 blend of yogurt cheese and cottage cheese (see above)
3/8 cup granulated sugar
1 teaspoon vanilla
2 oz. finely ground Bran Buds
Place resulting mixture in 9 1/2" (or 9") pan.
Chocolate Batter:
4 tablespoons melted/softened butter
3/8 cup cocoa powder
1 3/4 cups granulated sugar
1/4 cup all-purpose flour
3 tablespoons arrowroot
1/2 teaspoon salt
40 ounces (5 cups) 2-to-1 blend of yogurt cheese and cottage cheese (see above)
2 teaspoons vanilla
4 eggs
Chocolate syrup (Trader
Joe's Organic Midnight Moo recommended), about 1/2 cup (8 tablespoons) altogether
Expect more than 7 cups of the resulting batter, but do not add this to the pan
all at once (otherwise, the syrup, which is also added here, may end up
floating—or perhaps sinking—too much to a single level, due to
density differences). Rather, this needs to be done in four installments. Wrap
the pan in foil just before adding the first installment. Minimize the foil's
disturbance in order to minimize its leakage risk.
For each of the first three installments, scoop about 1 3/4 to 2 cups of batter
into the pan. Then add about 2 tablespoons of chocolate syrup (close to 1 1/3
ounces by weight if using the TJ's brand recommended above). The best way to do
this is to squirt some thick, parallel stripes of it throughout the pan (the
TJ's syrup, as of this writing, comes in a squeezable bottle with a squirt
nozzle). Then pull a knife in perpendicular directions through these stripes in
the batter (just deeply enough for the installment being added) in order to
produce a wavy, swirl pattern (see photo below for an example).
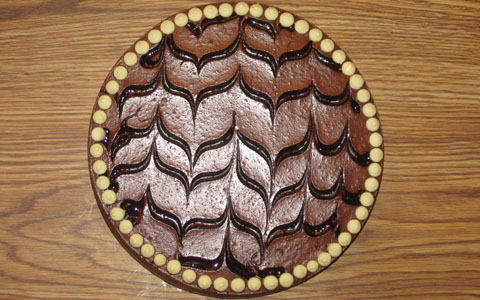
(Top view of finished cheesecake, with a suggested pattern)
Use extra care in the
later installments when adding batter (i.e., gently scoop it) into the pan.
After adding an installment, bake the pan with its contents at 325 degrees for
15 minutes, in a tub filled with at least 1/4 to 1/2 inch of boiling water. To
reduce spillage risks, do not fill the tub all the way at this point, because
the whole tub-and-pan assembly is going to need to be removed from the oven (in
order to comfortably add contents to the pan) between installments.
After all this is done, there should be about 1 3/4 to 2 cups of batter
remaining, with 45 minutes of baking time reached at this point (15 minutes for
each of the first three installments). Now comes the fourth installment—add
the batter and syrup in the same way as with the earlier three installments. But
try to place (and swirl) the syrup as neatly as possible on top, because this is
what is going to end up being exposed. So appearance is particularly important
for this final installment. Next, return the entire pan-and-tub assembly to the
oven. At this point, fill up the tub generously with boiling water. Resume
baking, but with the oven temperature lowered to 300 degrees, for about another
75 minutes (based upon usage of a 9 1/2" pan).
Afterward, shut the oven off, and leave its door slightly ajar, with the
cheesecake still inside—and in the tub—for an hour. Next, remove the
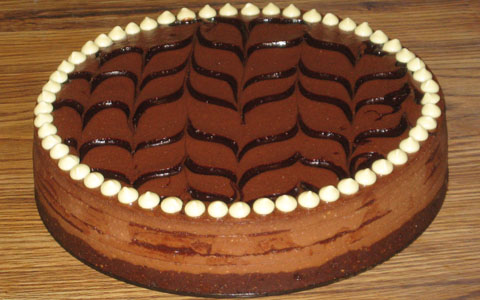
cheesecake from the oven and tub, and—if desired—add a border of
chocolate chips around the edge of this cheesecake. Continue to cool it down at
room temperature for another two hours. After doing so, remove the cheesecake
from pan and refrigerate.
|
|

|