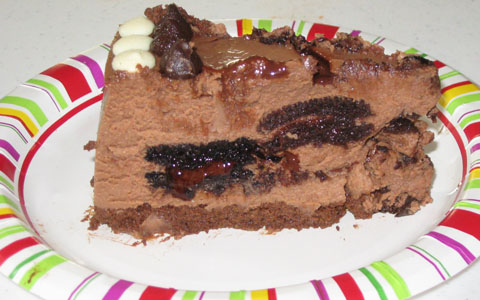
Baked Chocolate Cheesecake—Prototype 17 (7-Way Chocolate):
 
Now things are really getting chocolaty here—a chocolate cheesecake (interpret that as chocolate batter and chocolate crust, of course) with chocolate syrup and double-chocolate sandwich cookies (chocolate cookie outsides with chocolate creme in the middle)—and don't spare the chocolate chips (two kinds) border! Did you count all that? I counted seven. That's one loaded cheesecake!

Although I tried to pursue a fairly exact Oreo-like taste in my all-natural quests for a vanilla creme sandwich cookie in the past (see
Cookies+Creme Cheesecake for more information), I made no effort to approximate Oreo's chocolate creme version. Why?

Oreo's vanilla creme sandwich cookies have stood the test of time. This classic has become one of America's top cookies. On the other hand, I have reasoned that its chocolate creme counterpart did not have anywhere nearly as much "seniority". With this later Oreo product being not much older than competing brands (perhaps even being younger in some cases?), I felt that I should not regard it as an established standard by which all other brands are to be compared. In light of this, I chose to simply consider a natural brand without performing any comparison tests against Oreo. As long as the natural brand's taste was good enough, that would be my choice.

In fact, I bought two natural brands for consideration—Newman-O's and Joe-Joe's. After taste-testing both, I could not come up with a preference for one brand over another. So I used both of them on a 50-50 basis in this cheesecake—at least for the first time that I prepared Prototype 17.

Note also the crust's Bran Buds being replaced with regular ("Original") All-Bran, as well as the batter's omission of salt. These changes are derived from recent updates that I have done on other cheesecake flavors.
 
2-to-1 Blend of Yogurt Cheese and Cottage Cheese:
Prepare ahead of time 32 ounces of yogurt cheese, derived from two 32-ounce containers (that's 64 ounces altogether) of nonfat yogurt. If the resulting yogurt cheese falls below 32 ounces, add back enough of the whey (that was strained out from the yogurt) to make up the difference. To this yogurt cheese combine one 16-ounce container of whipped, lowfat cottage cheese.

Grease a 9 1/2" (or 9") pan, but do not wrap foil around it until just before the batter is added (spreading the crust in an already wrapped pan can result in greater disturbance to the foil, thus increasing leakage risks).

Chocolate Crust:
4 oz. semi-sweet chocolate, melted
2 tablespoons cocoa powder
8 oz. (1 cup) 2-to-1 blend of yogurt cheese and cottage cheese (see above)
3/8 cup granulated sugar
1 teaspoon vanilla
2 oz. finely ground All-Bran

Place resulting mixture in 9 1/2" (or 9") pan. Allow mixture to get firm. See note in comments below for more information on this.

Chocolate Batter:
4 tablespoons melted/softened butter
3/8 cup cocoa powder
1 3/4 cups granulated sugar
1/4 cup all-purpose flour
3 tablespoons arrowroot
40 ounces (5 cups) 2-to-1 blend of yogurt cheese and cottage cheese (see above)
2 teaspoons vanilla
4 eggs

Double-chocolate sandwich cookies, about 2 dozen

Chocolate syrup (Trader Joe's Organic Midnight Moo recommended), about 6 tablespoons altogether

Expect more than 7 cups of the resulting batter, but do not add this to the pan all at once (otherwise, the cookies and syrup, which are also added here, may end up floating and/or sinking too much to a single level, due to density differences). Rather, this needs to be done in five installments. Wrap the pan in foil just before adding the first installment. Minimize the foil's disturbance in order to minimize its leakage risk.

For each of the first four installments, gently scoop about 1 1/2 cups of batter into the pan. Add about 6 cookies (don't bother breaking them up—keeping them whole is fine and, in fact, recommended), ensuring that they are fully coated and immersed. Then add a generous amount, close to 1/4 cup, of chocolate syrup (almost 3 ounces by weight if using the TJ's brand recommended above)—but add this syrup only for the second installment (of the first four installments described here). The best way to do this is to squirt some thick, parallel stripes of it throughout the pan (the TJ's syrup, as of this writing, comes in a squeezable bottle with a squirt nozzle). But—do not swirl the syrup with a knife on this second installment.

After adding an installment, bake the pan with its contents at 325 degrees for 15 minutes, in a tub filled with at least 1/4 to 1/2 inch of boiling water. To reduce spillage risks, do not fill the tub all the way at this point, because the whole tub-and-pan assembly is going to need to be removed from the oven (in order to comfortably add contents to the pan) between installments.

For the fifth (and final) installment, gently add the remaining batter to the pan, but do not add any more cookies. Instead, add some more chocolate syrup on the top surface. Squirt thick, parallel stripes of this syrup, about a couple of tablespoons altogether (almost 1 1/2 ounces by weight if using TJ's), throughout the pan. Then pull a knife in perpendicular directions through these top stripes in the batter (just deeply enough for the uppermost installment's surface) in order to produce a wavy, swirl pattern (see photo below for a suggestion). Do all this as neatly as possible (avoid cutting into the lower installments underneath).

After the fifth installment (including the syrup) is in place, return the entire pan-and-tub assembly to the oven. At this point, fill up the tub generously with boiling water. Resume baking, but with the oven temperature lowered to 300 degrees, for about another 65 minutes (based upon usage of a 9 1/2" pan).

Afterward, shut the oven off, and leave its door slightly ajar, with the cheesecake still inside—and in the tub—for an hour. Next, remove the cheesecake from the oven and tub. Now, for the final chocolate touch, add a border of chocolate chips, semi-sweet and white, around the edge of this cheesecake (see photo below). Continue to cool it down at room temperature for another two hours. After doing so, remove the cheesecake from pan and refrigerate.
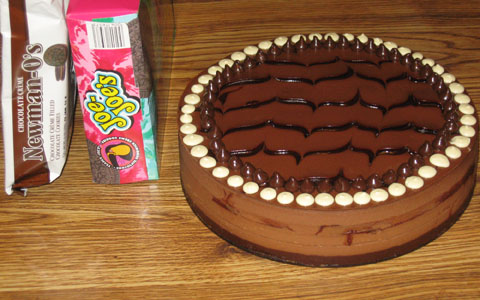
Chocolate Cheesecake—Prototype 17 Chocolate Cheesecake—Prototype 17 (sliced)

Of all the cheesecakes that I have brought to family/relatives' occasions up to this point, it appears that Prototype 17 of my chocolate cheesecakes ended up being the most successful one ever—by far! By the time I finished serving this one at our annual cousins' summer reunion in 2013 (held at my cousin Robin's home in Manchester, New Hampshire, for the first time—after many years at my cousin Joanne's in Peabody, Massachusetts), this dessert was nearly 2/3 gone—which, for a get-together like that, was really terrific! In the past, I had brought to other family/relatives' occasions a number of other cheesecakes hardly any larger than half the size as this latest one, and those were often less than halfway gone—many of those times with my eating the "bulk" of whatever was consumed (and with there being no more than a tiny handful of other takers). With my later cheesecakes in big sizes like the latest one presented here, it certainly was not unusual for me to have an overwhelming amount left over at a cousin's house. While many of my cheesecakes were hugely successful at Living Hope Church, I had yet to achieve a real winner with my relatives. It looked like I had finally scored one here.

I personally enjoyed this very chocolaty prototype myself. Much of what was left over from the reunion went to some of my friends for their enjoyment. So this cheesecake didn't last very long (I did
not have to "stomach" the "bulk" of it). In the end this loaded, chocolate cheesecake was...a loaded success!

In fact, I decided to repeat Prototype 17 nearly a week later for Living Hope Church as well. The cheesecake was almost completely gone within a half hour (among a modest snack selection). One last tiny piece remained for perhaps an additional half hour. I ended up finishing off that one.

In light of all these things, this extremely chocolaty cheesecake may go down as my most successful cheesecake ever, at least up to this point.

Chocolate Cheesecake—Prototype 17 (almost 1/6 gone) Chocolate Cheesecake—Prototype 17 (about 1/2 gone)
Chocolate Cheesecake—Prototype 17 (about 1/2 gone w/ sign) Chocolate Cheesecake—Prototype 17 (about 2/3 gone)

This cheesecake was so good (as well as so complex on the inside) that I was moved to include additional pictures here.

Sign—Chocolate Cheesecake 17 (LOADED!!)
Here is more complete portrayal of the sign I provided with this cheesecake!

Any more encores? Yes! A few weeks later, I asked my cousin Joanne to select a cheesecake for me to bring to a Rosh HaShanah lunch at her house (hosted each year for her relatives, plus some friends). She enjoyed this chocolate prototype served at the annual cousins' reunion so much that she chose this one (this is the same Joanne who hosted that summer event in the past before letting Robin take over for this year).

And it ended up being a great hit at Joanne's home (about 2/3 of it gone, which for a rather small gathering was impressive). What a sweet way to start off 5774 (the Jewish new year)!

So what did I do with the rest? It somehow got a little further reduced until about 1/4 of the entire cheesecake was left. That was probably because I myself ate more of this irresistible treat.

I froze this remaining leftover for nearly a week, then I thawed it in order to bring it to darts at the Italian Community Center in Beverly. Lesa's friend Steve was wowed by it. Melissa, the wife of another one of the players on Lesa's team, tasted my cheesecake and rated it considerably better than that of The Cheesecake Factory (and that was supposedly on taste alone). Now that's a real compliment and a half (particularly for something nutritionally superior as well)! All of the cheesecake was finished off before we left the club that night.

NOTE: With this third preparation of Prototype 17, I made a small change in how I firmed up the crust before adding the batter to it. Rather than refrigerating it, I pre-baked the crust (without a tub at this step) at 300 degrees for about 10 minutes. Then I let the pan cool off until it could be comfortably touched. This was done in order to make it easier, later on, to separate the finished cheesecake from the pan's bottom.
 

Back to my bushy homepage