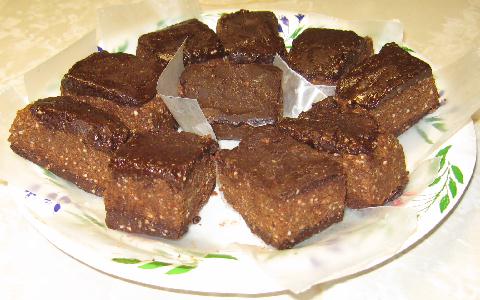
Chocolate Bran Buddy Bars—Prototype 1:

After having made Prototype 6 of the Chocolate Peanut Butter Bran Buddy Bars, it was time to try a chocolate-only version (which is largely based on that prototype).

For the crust (featuring cocoa, along with additional milk, sugar and vanilla) start with...
1/4 cup skim milk, heated and combined with...
1/4 cup cocoa powder. Fully dissolve this in the milk, then blend in...
12 oz. cream cheese. Then add...
1 cup sugar. Blend thoroughly, then add...
2 teaspoons vanilla (next to last ingredient here). Blend this in, then finally mix in...
8.8 oz. finely ground Bran Buds

Sequential details (combining order) for filling:
12 oz. melted, semi-sweet chocolate
4 oz. cream cheese
1/4 cup sugar
2 teaspoons vanilla (last ingredient here!)

Note that only cream cheese, sugar and vanilla (identical amounts on this one!) are used for both the crust and filling.

Press half the chocolate filling into the 13" x 9" wax-paper-lined pan (if necessary, apply a minimal amount of broiler heat to facilitate the spreading). Then firm this up by chilling it in the freezer for 20 minutes.

Remove the pan from the freezer, and add the crust mixture on top of the lower chocolate layer. Press it down firmly...but do NOT return the pan to the freezer afterward (the crust mixture was already fairly stiff).

Instead, proceed directly with pressing the remaining half of the chocolate filling on top of the crust layer, applying broiler heat as needed (be careful, and do not overheat). For some reason, spreading the filling (top and bottom) was not all that easy this time.

Apply a final shot of heat, this time BAKING briefly (instead of broiling), hopefully to get the chocolate filling layers, especially the bottom one, to adhere better to the crust.

Cool the pan until it can be comfortably touched, then put it into the refrigerator. Refrigerate until firm, about 60 to 90 minutes. For the sake of cutting, do not refrigerate for too long (the idea here is to prevent the filling layers from cracking up or coming apart).

There was still some disintegration here, but hopefully not as badly as in the aforementioned Prototype 6 of the chocolate peanut butter bars.

Despite omitting the peanut butter, the taste of the chocolate-only bars was still close to that of the chocolate peanut butter ones. This was probably due to whole wheat (of which bran is a particularly important characteristic) tending to have a "nutty" flavor.
 
Laurie loved these chocolate ones a lot! This time she was present when I served these Bran Buddies, and I got an overwhelmingly great response from other people as well (along with preferences for this recipe over the chocolate-peanut butter versions). Lesa's partner Steve pleaded for me to not change this prototype. Thus I felt like I hit a big winner with this one. Furthermore, the taste seemed less "nutty" and more "chocolaty" at the time I served these guests (nearly 3/4 of a day after my somehow perceiving a nuttier taste as I was cutting these bars).

So it looks like I have managed to accomplish a prototype to greatly please the crowds. But the filling's excessively thin layers still made my work difficult.

It was time for me to bring up a sizing issue at this point.

In many of my earlier chocolate peanut butter prototypes, I made full recipes and used a 13" x 9" pan. However, for later prototypes and this chocolate-only version, I went with only HALF recipes (in order to reduce excessive leftover problems that I had to deal with). Because of this, I switched to a 9" x 9" pan.

So why did I in these notes list the measurements based on FULL recipes in the later prototypes, despite making half-size batches? It was likely to make proportional comparisons much easier.

But there was a catch, something that hopefully hardly mattered in the earlier prototypes. But it would indeed matter in Prototype 6 of the Chocolate Peanut Butter Bran Buddy Bars and Prototype 1 of the Chocolate ("only") Bran Buddy Bars, due to the 2-layed chocolate filling approach. The 9" x 9" pan used in the half recipes was NOT half the size of the 13" x 9" pan used in the full recipes. The smaller pan was proportionally much larger!

Shall we do the math here? Both pans are 9" wide. So in keeping with the full recipe proportions, if the full-sized pan is 13" long, then the smaller pan's corresponding dimension for the half recipes should be only 6 1/2". But the measurement here is actually 9". How much bigger is that? 9" / 6.5" = about 1.38. That's about 38% too big! Therefore, the layers are stretched out considerably thinner in a 9" x 9" pan when a half recipe is used (about 28% of the thickness is diminished).

Got 6.5" x 9" pan (for half recipes)?

Such a pan could improve the thickness of those excessively thin chocolate filling layers by about 38%, and this can be helpful in reducing disintegration problems.

An even sweeter idea for full recipes is to use the 9" x 9" pan instead of the 13" x 9" one. Now we're talking double-thick filling layers that we can work with, compared to the half recipe-9" x 9" pan combination (about 44% thicker and easier than the full recipe-13" x 9" pan combination, by the way).
 
Chocolate Bran Buddy Bars—Prototype 2:

Repeat Prototype 1, but substitute whipped lowfat cottage cheese for the lowfat cream cheese. And this time, thicken up! Use a full recipe (instead of half), and put it all in a 9" x 9" pan.

Chocolate Bran Buddy Bars—Prototype 2

The bars looked (and tasted) great in their thicker form, but there were still some disintegration problems, likely due to the timing of my cutting these bars after refrigeration. All this painstaking preparation, off to a late start, was getting well into the wee hours of the morning, and I wanted to get to bed. So I finally did so shortly after putting the finished recipe in the refrigerator for a firm chill. Therefore I did not get around to cutting up the bars until at least four or five (too many) hours afterward. Applying some quick oven heat helped a little.

All this happened on a very eventful weekend, so my schedule was a bit crazy, but I wanted to make some Bran Buddies to bring to a friend's house for a Shavuot celebration on the Sunday of that weekend. Many people there liked the recipe.

A number of days later, I also presented these thicker bars to Lesa and Steve, who enjoyed these as well as the earlier prototype (Steve was particularly enthusiastic about these chocolate-only bars).
 
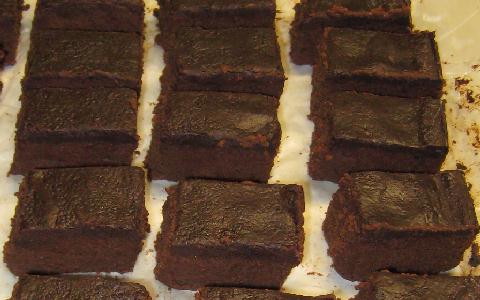
Chocolate Bran Buddy Bars—Prototype 3:

Let's face it. To make a batch of three-layered (filling-crust-filling) Bran Buddies has certainly become so time-consuming. And the lower layer of filling breaking up upon cutting these bars (after chilling) only added to the difficulty.

It was time for some kind of compromise. Retain only the top filling layer, and merge the lower one into the crust. While this would result in the relatively dry crust being at the bottom and hence more likely to hit the eater's tongue (sorry, Laurie), at least this reformulated crust would be somewhat moister. Furthermore, the bars wouldn't be as messy to handle (the dual-filling-layers version tended to melt easily in one's hand).

So Prototype 2 gets repeated, but the ingredients for the bottom filling layer get combined with those of the crust mixture. Here are the details:

Crust:
1/4 cup skim milk, heated and combined with...
1/4 cup cocoa powder. Fully dissolve this in the milk, then blend in...
14 oz. lowfat cottage cheese, whipped. Then add...
1 + 1/8 cups sugar. Blend thoroughly, then add...
6 oz. melted, semi-sweet chocolate
1 tablespoon vanilla (next to last ingredient here). Blend this in, then finally mix in...
8.8 oz. finely ground Bran Buds

Filling:
6 oz. melted, semi-sweet chocolate
2 oz. lowfat cottage cheese, whipped
1/8 cup sugar
1 teaspoon vanilla (last ingredient here!)

Press the crust mixture into a 9" x 9" wax-paper-lined pan. Then firm this up by chilling it in the freezer for 20 minutes.

Remove the pan from the freezer, and add the chocolate filling on top of the crust layer, carefully applying broiler heat as needed.

When the pan is cool enough to be comfortably touched, put it into the refrigerator. Chill until the top filling is almost completely firm, about 60 to 90 minutes, then cut into bars. Return these to the refrigerator, and chill until fully firm.

Chocolate Bran Buddy Bars—Prototype 3

What a difference dealing with the filling being only on top! There were hardly any disintegration problems. Another helpful factor had to do with the timing of cutting these bars, which was after maybe about an hour (or a little longer) of refrigeration. At that point, the filling was slightly soft (hence just right for cutting). I no longer had to wait for some kind of bottom filling layer to get considerably hard (hard enough to avoid getting squished out under the pressure of cutting the bars, but also prone to easily getting broken up as well).

And this prototype was still a great success, particularly at the Sports Page, a place frequented by Lesa, Steve and their friends for playing darts, singing karaoke or just hanging out—where I have brought in many past Bran Buddy prototypes in addition to this latest batch of chocolate ones (Steve loved 'em)!
 

Back to my bushy homepage